Burlap Wreath Tutorial for Beginners
A burlap wreath tutorial is perfect if you want to transform your outdoor home this season. If you love all of the burlap wreaths that you see on Pinterest, in home decor magazines and at your favorite arts and crafts store, but have been afraid to make them, then this quick and easy tutorial is for you! All you will need are some simple materials such as burlap ribbon, a wire wreath frame, and other tools to get started with. What we love about burlap wreaths are their versatility. They can be rustic and vintage looking or you can make them modern with simple embellishments. Don’t feel like you have to make your burlap wreath look exactly like the ones you see on Pinterest – Burlap Wreaths. Be creative and start with this one first, then move on to different sized shape wreaths, different ribbon types, and more.
Burlap Wreath Tutorial for Beginners
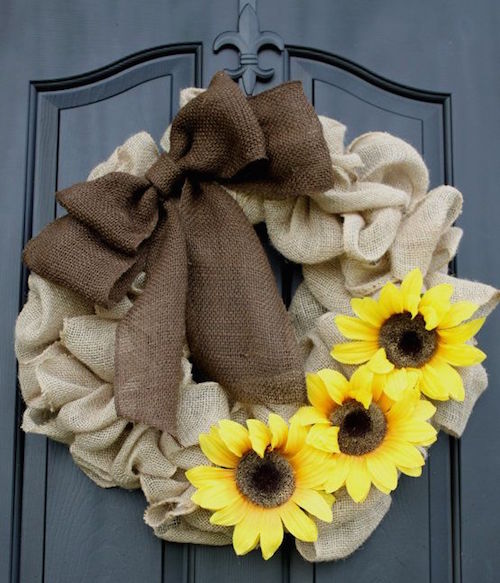
Image via – Etsy – Sunflower Burlap Wreath – Our Sentiments
Learn from this Burlap Wreath Tutorial:
Before you get started take a trip to your local arts and crafts store or you can get all of your supplies online. We have created a materials list for you to go from. Feel free to try different types of burlap ribbon. They come in all types of colors, embellished with lace, gold, silver and more. Think of the occasion, setting your wreath will be displayed in. Choose colors that will compliment your front door, your fireplace, or even over a mirror in your bedroom can be gorgeous.
Image via: Etsy – Chevron Burlap Wreath – Cindi Davis1
Burlap Wreath Materials
- Roll of 6″ wide Burlap Jute Ribbon * (30 feet long) : (Ideas for Types of Ribbon Burlap with White Lace Ribbon, Burlap with Red Lace Ribbon, Chevron Print Burlap Ribbon )
- Scissors
- 12 inch Wire Wreath Frame Form: (Ideas for Types of Wire Frames – Heart Wire Wreath Frame, Square Wire Wreath Frame, Star Wire Wreath Frame)
- 6 Black Pipe Cleaners cut into 6″ pieces
- Wired Ribbon, 2-1/2-Inch Natural Color
- Leaves and flowers to decorate if you’d like to add after the wreath is completed
- Hot Glue Gun with Glue Sticks – to attach leaves and flowers
Directions for Making a Burlap Wreath:
1. Use one end of the burlap ribbon to make a knot around the wire wreath. You can also secure the burlap with a piece of string or pipe cleaner.
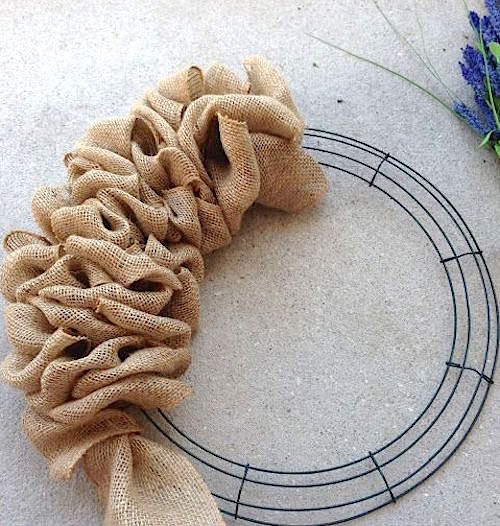
2. Push the burlap into one of the sections of the form. Be sure to twist it so that the loop is sideways (this ensures that the wire wreath form is covered).
3. Continue making loops but make sure that the next “bubble” in the wreath is next to the one you just did. This helps hold the previous loop in place. Keep the loops even in size as you push the burlap through the form.
Image via: Little Lovely Leaders
4. Continue making loops until the wreath is as full as you want. You can make all your “bubbles” the same size or vary the size for a more asymmetrical finished burlap wreath.
5. Cut off the burlap if you have extra.
6. Make another knot to complete the wreath or tuck the end into the bubbles.
7. Use pipe cleaners to keep the burlap in place on the back of the wreath.
Extra Tips for your Burlap Wreath Tutorial:
Depending on if you want to embellish your wreath with flowers or bows you can hot glue on your accessories or you can create your own bow from Wired Ribbon, 2-1/2-Inch Natural Color.
1. Hot glue the leaves, flowers, bows, and other ornaments you may have.
2. Watch the wreath video above to learn how to attach the wire ribbon bow.
Once you’ve completed your wreath, step back and decide if it’s how you envisioned. If you need to add more embellishments, more colored wire ribbon, or if it looks good for your home. If you have any ideas of how you make your burlap wreaths, we’d love to hear from you in the comments section!
Tags:
Replies to This Discussion
Have questions?
Need help? Visit our Support Group for help from our friendly Admins and members!
Have you?
Donations & Sponsorship
Connect
Visit The Temple
on Facebook:
Blog Posts
Joke Corner
Posted by William J. Coblentz on April 28, 2024 at 8:03am 9 Comments 9 Likes
Channeled Angelic Wisdom of the Jewels of Truth Series on Beneficence and Heaven on Earth
Posted by Atrayo on April 17, 2024 at 10:26am 0 Comments 1 Like
Channeled Angelic Wisdom of the Jewels of Truth Series on Unconditional Truth and Free Will
Posted by Atrayo on April 14, 2024 at 7:54am 0 Comments 1 Like
Channeled Angelic Wisdom of the Jewels of Truth Series on The Afterlife, God, & World Peace
Posted by Atrayo on April 6, 2024 at 1:51pm 0 Comments 1 Like
coat of arms of McIntyre clan.
Posted by Ghillie Dhu on March 2, 2024 at 5:06am 4 Comments 0 Likes
Channeled Angelic Wisdom of the Jewels of Truth Series on Destiny, Future Past, and Meta-Genesis
Posted by Atrayo on February 22, 2024 at 12:54am 0 Comments 1 Like
Channeled Angelic Wisdom of the Jewels of Truth Series on Sex Addicts and Jealousy
Posted by Atrayo on February 14, 2024 at 6:57pm 0 Comments 1 Like
Are Ouija Boards Evil?
Posted by Bill Walker on February 1, 2024 at 8:15pm 1 Comment 1 Like
PAGAN GLBTQ Pansexual/Hetero ADULT QUANTUM ECLECTIC BOOK LIST - PARTS 1 & 2 - 2024
Posted by Sky a.k.a. JD Aeon on January 7, 2024 at 4:43am 1 Comment 5 Likes
Channeled Angelic Wisdom of the Jewels of Truth Series on The True Sons and Daughters of God, Decision Making, God, and Majesty of Being
Posted by Atrayo on December 29, 2023 at 1:04pm 0 Comments 1 Like
TO RISE AND FIGHT AGAIN
Posted by Kitt on December 14, 2023 at 8:55pm 2 Comments 4 Likes
Channeled Angelic Wisdom of the Jewels of Truth Series on Spiritual Modesty, Exalted, Glories of God, & Grace
Posted by Atrayo on November 29, 2023 at 11:21pm 0 Comments 2 Likes
Osiris the Warlock: The Cursed
Posted by 06iiris on October 13, 2023 at 8:30am 0 Comments 1 Like
Osiris the Warlock: Horus Lives!
Posted by 06iiris on October 13, 2023 at 7:00am 0 Comments 0 Likes
Osiris the Warlock: Nanna-Sin
Posted by 06iiris on October 12, 2023 at 3:30pm 0 Comments 0 Likes
Osiris the Warlock: Daemon
Posted by 06iiris on October 12, 2023 at 6:00am 0 Comments 0 Likes
Osiris the Warlock
Posted by 06iiris on October 12, 2023 at 5:30am 0 Comments 0 Likes
The (3l)ack & Red Dragon
Posted by 06iiris on October 11, 2023 at 1:00pm 0 Comments 0 Likes
The Sin (3l)ood Omen (II)
Posted by 06iiris on October 11, 2023 at 8:30am 0 Comments 0 Likes
The Sin (3l)ood Omen
Posted by 06iiris on October 9, 2023 at 7:30am 0 Comments 0 Likes
NOVEMBER AWARENESS
Videos
-
Two Become One
Added by Imelda James 0 Comments 0 Likes
-
You and I Love
Added by Imelda James 0 Comments 0 Likes
-
Deuce - America
Added by Bryan_Thoth 0 Comments 0 Likes
© 2024 Created by Bryan
Powered by
![]()


